Search This Blog

Thursday, 26 December 2013

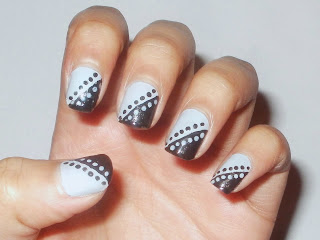
Diagonal polka dot nail art

This was from a while ago, but I had to do something smart on my nails for a formal event and didn't want any bright colours on my nails so I made up this design.

I separated my nails diagonally and painted them with two contrasting colours - a black and a light grey. The black I used was by Barry M and the grey was called 'Angel Wings' by Collection.
I then used a dotting tool to print dots along the diagonal lines with the alternate colour on each sides - so on the black side I used grey dots and for the grey side I used black dots.
This is what the finished look looked like...


I also found that from a distance, the dotting effect made it seem like the grey blended into the black and looked almost like a gradation. It looks really effective and didn't take long to do. 
You don't have to stick to these colours, you can use whatever you like to make it look more fun but I think contrasting colours work best.
Try it yourself ♥
Monday, 23 December 2013

Bandage dress inspired nail art

So, I came across this really pretty shade called 'Milkshake' by Collection. It's a lovely, light pink dusty colour and I thought it'd make a nice base to do a contrasting nail design with.
I thought up of this design and it's where you basically have to draw lots of straight lines in different directions so that they look they are over and under lapping each other. This is similar to what the material is like in bandage dresses as they have to be wrapped around the body. I actually found this picture after I did my nails like this but the top part of the dress is nearly exactly the effect I had recreated on my nails....

I used a fine nail art pen (LA Colours) so that I could create these steady lines. 
This is what the finished design looked like:


These really stand out and I got a lot of compliments. I was also told they look quite tribal which I think is good as that's a big trend at the moment. 
They did take me a while to do, especially on my left hand but I definitely think it paid off. 

I hope you have a go and let me know what you think ♥


Sunday, 22 December 2013

Tiger print nail wraps

I rarely use wraps, but I had these lying around so I thought I'd use them. They're these glitter textured tiger print nail wraps which are really easy to apply. 

First, you select a suitable size and stick it on your nail. Then, you get a hairdryer and blow heat over the nail to melt the glue onto your nail. Let it cool and file off the excess. You can also apply a bit of top coat on the tip of your nail to secure them and so they don't chip. I wouldn't advise putting a top coat over the whole nail as that will ruin the textured effect. 

This is what they look like:
 

These lasted me a little longer than a whole week which i think is pretty good. There's loads of different designs you can try and they're great if you don't have time to do your nails yourself.
Thanks for reading ♥